Saturday, December 28, 2013
The Energy Star / CFL Efficiency Myth

If you still want incandescents:
Newcandescents
First posted on 02-01-07:
For years the Federal Energy Star program has perpetuated the myth that if you buy appliances (or any electrical device) for the home that uses less energy, you'll see proportional savings in your monthly power bill. This is rarely the case.
Other eco-writers do similar simplistic math to calculate savings in money, energy, and carbon. A recent example is Charles Fishman's September 2006 article in Fast Company magazine about WalMart's CFL project, "How Many Lightbulbs Does it Take to Change the World?".
The claim is made that if a single light bulb using 45 watts less is placed in 100 million homes, 6.57 billion Kilo-Watt-Hours will be saved. The fact is, unless you are cooling your house, there is often ZERO savings. Charles focused on the bulb, but forgot about the home. His entire premise is based on a false assumption. The savings are grossly exaggerated for most homes.
"Wasted" energy takes the form of heat. And this heat helps keep you warm, if only just a small amount. For most of America, for much of the year, that 45 watts will be automatically added back in by the home heating system to maintain the same level of comfort. If the home is heated with electricity, the savings in dollars, energy and carbon production is literally ZERO.
The only time energy is actually saved is when the air conditioning is running or you have the windows open to cool the house. With the air conditioning on, the savings can even be a little greater than 45 watts, but for most of America, that's a small part of the year. What are the savings for the rest of the year?
ZERO!
If you are not cooling your home, EVERY light bulb and appliance is 100% efficient.
Here's why...
The second law of thermodynamics demonstrates that "wasted" energy tends to disperse evenly. And if this "wasted" energy is in your house, it simply keeps you warm. More importantly, it keeps your normal heat source from turning on. Let's see how it plays out in a real home and why saving energy by turning off the lights is mostly an illusion.
If you have a home in the northern latitudes which is electrically heated much of the year, you are a net consumer of heat. And the nice thing about heat is that It doesn't matter where it comes from. And that's the key.
Take a light bulb that's only 10% efficient. That means 90% of its energy is converted directly to heat. So what happens to that heat? It spreads out through your house and slightly delays your normal heating system from clicking on.
And what about the 10% of the energy in the form of visible light? Virtually all of it strikes objects in the house. It too is converted to heat. The ONLY ineffectiveness of a light bulb in a northern home in the winter is the light that escapes through the windows, which is a VERY small amount. Even THAT can be stopped with curtains making ANY light bulb 100% effective at producing heat. Here's how Wiki explains it... Efficiency versus Effectiveness.
Why do I qualify this with northern homes and winter? Because if you have to open the windows to be comfortable, you lose the advantage. And if you have to turn on the air conditioning, this "effectiveness" actually becomes a small liability. So those of you in Florida and south Texas... never mind.
It's all about heat, where it moves and how we store it. But for most of America, much of the year, energy efficiency is very much an illusion. Effectiveness rules the day because we actually USE that "inefficient" heat.
And if your windows are closed but your heat is NOT turned on? Or not turned on until later at night? Those appliances are still 100% effective. That's because they are helping keep the house warm. They are one reason your electric heat hasn't come on yet. If that heat doesn't come from one source, it has to come from another.
But what if you're a bit on the warm side in the late afternoon but you haven't opened the windows? Again, it doesn't matter. This thermal inertia will delay heating later on. As long as you don't have to cool your house, everything is 100% effective. Let's take a couple more examples.
Electric blanket - 100% effective. If you turn it off, the electric wallboard heating will kick up 100 watts to compensate: net cost of blanket electricity for the same comfort level - zero.
TV, DVD & computer - Left on all the time? No problem, as long as the air conditioning doesn't kick on.
Hair dryer - 100% effective (and only used for short periods anyway), so get every hair in place.
Electric toothbrush - Yep. Even its charger is a perfect machine in this context.
Refrigerator - 100% effective. This is one of my favorites. What does a refrigerator do? That's right. It compresses gas to pump heat from the inside to the outside of the icebox. Where does that heat go? It heats the kitchen! Even the compressor is 100% effective! Once again, it saves energy that might come from electric heat.
Why do I keep referring to electric heat instead of oil or gas? That's because in the past gas has been far cheaper than electricity per BTU. This made electrical devices a little less "effective" (and a little more expensive) in producing that "wasted" heat. Unfortunately, cheap gas is history (update - well, it was in 2007). The cost of oil and gas heating now approaches that of electricity (at least during the price spikes which are likely to be more common in the future). So for many, there's no big difference. Leaving your TV on is almost as cost effective as buying natural gas.
Another even more significant exception is if you warm your house with a heat pump. Heat pumps with a good source are three times more effective than electrical resistance heat so two-thirds of the stated saving ARE real. CFL and Energy Star DO represent significant saving in this case even though one-third of the savings is still an illusion. Your mileage may vary but it will always be less than claimed by these "expert" sources.
With electrical resistance heat, this "effectiveness" creates the strange situation where you could turn EVERYTHING in the house OFF (except for the electric heat) and set in the dark for a winter month with no entertainment or hot food - and your power bill would be EXACTLY same. Try it sometime. You'll see.
This also means you could go out and buy the most efficient light bulbs you could find and all new Energy Star appliances; STILL, the power bill would be EXACTLY the same. So enjoy your gadgets and think twice before spending extra for "efficiency". Spend your money where it counts.
And where might that be? If there's little advantage to "efficient" appliances, how can we save energy and money? That's another blog post but start by taking a look at the heat leaving your home through the walls or down the drain as hot water. Those two are your biggest loses.
Heat and air conditioning use 50% of home energy. Better insulation and sealing can save up to 25% of your energy cost for the typical home. But make sure the house still has reasonable ventilation - especially in radon areas. And hot water is about 13% of your energy use, so again, use it carefully. It's not effective to heat up the sewer drains.
Which brings up one important exception to this "effectiveness" rule - the clothes dryer. It blows it's heat outside and also brings in cold air - you lose. It's a good reason to get a clothesline. Or use the dryer sparingly.
And if you still want to buy some of those CFL bulbs, put them outside. That's one place where ALL the savings count.
There you have it. Now you can sleep better (and warmer) knowing your heat isn't as "wasted" as you thought.
OK. If you still want to know how much of that 65.7 KWH you would save by buying that bulb, multiply it by the ratio of cooling days over days in a year (365.25). The extra air conditioning load will be offset by less probable need for light in the summer. For me in Reno, Nevada that extra efficiency can be used about a quarter of the time (in the summer) which is probably about average for America. This makes WalMart's claim overstated by four times - you decide if that bulb still makes sense.
But why would Fast Company, WalMart and Energy Star not point this out? Simple. It would make the story less exciting, WalMart would sell fewer light bulbs and... and... and I don't know WHAT'S wrong with the Federal government.
So from now on, don't let some slick magazine make you think a new light bulb will solve all your problems; don't expect WalMart to always save you money. And finally, don't expect the government to set them both straight. When you hear about efficiency, think also about effectiveness.
And quit worrying about your household appliances. They are almost perfect machines much of the year. No matter what their efficiency rating. Please leave a comment if I've missed something.
11-30-11 - The best counterpoint to my post that I've seen so far:
The Math Changes on Bulbs - Wall Street Journal
03-12-12 Ready for $50 Light Bulbs?
Friday, December 27, 2013
Green Float concept: a carbon negative city on the ocean
Seasteading New Nations Becomes a Practical Engineering Challenge 12-27-13
First posted 11-11-10:
When it's time to railroad, there will be sailboats...

Some of you may remember my discussion from the mid-1990s about how to create artificial islands. My idea was to use air-entrained concrete full of Kevlar fiber to form large (50 x 50 foot) hex-pads with six keyed faces interlocking to other pads from the bottom up so that buoyancy and gravity hold them in place.
These pads would be weighted down then moved into place before releasing the ballast forcing the pad into a vertical lock with the existing structure. Working from the center out, the structure would be locally rigid but flex over a longer run. This would allow them to support buildings, a runway and even lagoons. The effect over a mile or so would be like scum floating on the water. It would give a bit but dampen any waves.
The plan would be to stack more locking layers under the larger buildings to support more weight. As building increased, more hex-pads would be lower into position under the keyed structure. The top would reflect what was under the water in a balance between weight and buoyancy.
The plan was to place the island in the doldrums, but to have some maneuverability using "keel" of hex-pads underneath and a "fin" of buildings above to act as a rigid sail. The theory was to create a dynamic which would allow for VERY slow sailing when needed, maybe even the ability to sail slightly upwind.
These guys have a more grand and green design and say little about the structure. My plan was to make it large enough to land a 737 and grow some veggies for a military base or vacation resort for hire - politically independent, of course.
Green Float Design
Wednesday, December 11, 2013
Burning Man 2013 - Getting Good At It
First posted 09-05-13:
Lake of Dreams - a VERY Cool 2013 Time Lapse

It's been a dozen burns and I'm finally getting good at it. How do I know? I've gained control of the process and the pace. My prep can be adjusted as needed, the shade and art are all set up before the gate opens, I bank my sleep and am still fresh on Thursday morning. Oh, and we finally made green on the LNT map.
But along with veteran status comes a degree of desensitization. I know the standard art forms and when the titty parade happens. For years I didn't bother watching the Man burn, but the last couple of times the peddle car has made it a whole new experience. And I guess that's the point. I'm able to find the subtle in a maelstrom of one damn thing after another. So Burning Man is still a hoot, just in a constantly changing way. If you've been, you know what I mean. If you haven't, nothing I write will change that. But I do like to post of few links.
As often happens, I discover some of my favorite stuff AFTER the burn. In this case it's a brilliant series of blog posts, and my favorite Burning Man story of ALL time. Be sure to read all 8 parts. It's mostly set about a hundred yards from our camp this year so I remember much of what he describes. It has SO many great lines, and yes, it's full of inside humor, just the thing to capture a veteran Burner's heart:
Burning Noir: a Chance Meeting with Augustus St. George
Another excellent attempt to capture the essence of Burning Man:
How to Dismantle an Anatomic Bomb: A Recently Un-virgined Account of the Burning Man Festival
One of the very best video summaries:
Thank You for the Memories
Another excellent production:
The Burners of Cargo Cult
CoRE photos:
Burning Man 2013 CoRE Projects 360° Panoramas
Aerial view:
Burning Man 2013 aerial video sampler
Great photos:
Burning Man 2013
A journalist who's actually BEEN to the playa:
The futile exercise of writing about Burning Man
A Burgin's take:
55 Things I Learned At Burning Man
Captures the light and smiles, plus the best Ichthyosaur video so far:
Video of Reno projects
50 of the coolest Burning Man art installations ever
Honoring Snoop Dog: Drill in and Tranzizzle any web page for any topic. Wikipedia works great. VERY cool:
Excellent Music and Video Editing
Burning Man 2013 // Let It BURN Video
Another beautiful one:
We Are Only Human
6 Things The World Could Learn From Burning Man
As The Dust Settles: A Participatory Documentary
Through the eyes of an 81 year old virgin:
Charlie Goes to Burning Man
"Life is a moment to celebrate, to enjoy.
Make it fun, a celebration,
and then you will enter the temple." - OSHO
Temple Guardians
A very Zen time-lapse of the event film:
Lake of Dreams
Wednesday, October 23, 2013
The Housing Bubble - For the Record
10-13-2013 Update:
This is actually a bit old now but he’s calling it like I see it. - Darren
Nice summary, and I agree with it as far as it goes.
The question now is, how are all these investors going to have time to drive around and enjoy their new homes?
The reality is, these “properties” have simply moved from one set of file cabinets to another. Sure a few of the small local investors have rehabbed and flipped or rented, but the bulk remain empty. So the question not asked (nor answered) by that post is, where do the butts come from that will sit in those approximately five million houses? I’ve got one freshly painted and yet setting empty for the last year right next door – no sale, no tenant.
This “housing recovery” is simply the “ringing” caused by investors I’ve talked about before. This too shall pass, and I fear in the process find a new bottom for the housing market sometime in the next 36 months.
First posted 06-17-06:
It's impossible to call the top of a market, let alone a bubble. No matter. I've been calling the top of this one for the last two years and now it's finally happening. So I think it's time to document my predictions, before history starts to be rewritten. It's time to go on the record.
My anti-home ownership campaign started with a bit of sticker shock. I've owned one home after another since I was 21. Well, at least until I got divorced in 2003. Since then I've been renting - here's why.
When I went to buy a new house, I couldn't believe how much prices had run up. And it just kept getting worse. The longer I waited, the crazier it got. If I'd known how stupid this market was going to get, I would have flipped a couple myself while I was waiting. Hindsight is 20/20. Like I said, you can't predict market timing, so I didn't. I sat it out.
I've sat out every bubble I've ever discovered. I sat out gold in the 80s. I sat out the internet in the 90s (even while working in the middle of the tech world). And I've had my ass firmly planted in a rental for the last three years - tax advantage be damned! I just can't help it. The prices never make sense.
Here's how I know housing is in a bubble. You can use this tool to spot the next one. The key is fundamental value. That's what something's worth when no one's looking - when there's no speculation. It's the value that reflects the property's ability to produce income compared to other available investments.
An old rule of thumb is, a property is worth 100 times what it will return each month. That's a capitalization rate (rate of return) of around 12%. Again, that's just an estimate. There are always expenses to deduct and capital markets do vary some. Net return after costs in the 8% range for real estate is reasonable. When these cap rates fall below comparable investments, the ONLY reason to buy is speculation - THAT is when it becomes a bubble.
So ask yourself, how much rent would you pay for any given house? Now add two zeros. See what I mean? You will only find THOSE price in Kansas (something to do with whirling wind and unlimited vistas). Here in Reno you can rent a 2000 square foot house for $2000 per month. Therefore, it should be worth $200,000 as an investment.
But hold on... There's the sign out front! It's listed for $480,000 and sold a year ago for $395,000. If you bought it as a rental, it would only return 2% after expenses. That's also about $200 per square foot to buy or build.
Your mileage may vary depending on where you live and the quality of the building. But no matter how you rationalize it, houses have sold for twice (or more) what they are "worth" in a reasonable investment market.
Now, It's true rents are a bit depressed because of all the spec homes still sitting empty, but not depressed by THAT much. And this is just an average example. Much worse can be found. Just look around. Check it out yourself.
I've heard of new construction at Lake Tahoe being built and sold for over $700 a square foot. That (and growth in China) is why steel, concrete and other building materials have also had such a run up in the last few years.
But that's about to change.
Right along with the price of houses.
And it's WAY past time. The bigger a bubble gets, the worse the pain, when it pops. This one got pretty big in scale but not in value ratio.
Here's a comparison. The internet bubble created about four trillion dollars worth of new "value" in the economy but the value ratio was more than ten to one. So far housing has added TEN trillion dollars worth of "value", BUT has only doubled to do it. That's an important "BUT". We don't have as far to fall. It could have been worse. It can ALWAYS be worse when it comes to bubbles.
Some even better news is that it probably won't collapse as quickly or as far as the internet bubble. At the bottom, many internet prices actually went below their true investment value. That's not likely to happen with homes because people live in them. Living in them creates a lot of financial inertia.
Another way to look at it is, there was almost no real value in the internet prices. Many companies had no profit at all, so they had farther to fall. Housing has only doubled (or tripled in some cases) and those who can still afford the payments will likely stay in them. This will soften the crash.
We'll see a 15 percent drop in the next few months. This drop combined with variable rate mortgages and increasing interest rates will be enough to put a lot of marginal new buyers into forclosure. These bank properties will likely get in line with all the spec homes headed for the exit. This will just make things worse. For a while.
I believe house prices will fall for the next 18 months. They will bounce off the bottom at 20 to 40 percent below their peak of November 2005.
If you've owned your home more than three years and haven't refinanced in that time, you're probably OK. If not, batten down the hatches.
It's about to get ugly.
So there!
I'm on the record.
Let's see what happens.
You can watch it all at The Housing Bubble.
I just hope you're not watching it from a new home.
Sudden Disruption
Tuesday, September 17, 2013
Telomere Technology
Telomeres are a topic I've been following since 70s mostly in Science News. Skip to the bottom if you'd like to read my earlier links and posts. Here is the latest:
01-28-15 Telomere-lengthening procedure turns clock back years in human cells
11-14-13 Ming the clam, world's oldest animal, was actually 507 years old
09-17-13 In small study, healthy lifestyle fights cell ageing
Bill Andrews is the man responsible for leading much of the research on telomeres. Here's a link to summary:
Curing Aging by Bill Andrews
09-21-12 Almost everyone who knows me knows what a skeptic I am, and that I don't entertain ideas not based in science. I have not researched any of this work, so I can't vouch for it in any way. But last night I got the chance for long private discussion and personal tour of Sierra Science Labs. I'm convinced Bill's work is being done in good faith and he's determined to solve this problem. Watch this blog for updates.
05-24-12 Key gene found responsible for chronic inflammation, accelerated aging and cancer
05-16-12 - First Gene Therapy Successful Against Aging-Associated Decline: Mouse Lifespan Extended Up to 24% With a Single Treatment
Some of you have heard me talking about Telomeres for decades. Finally, we may be on the verge of practical application.
Below is the Popular Science cover story about Bill Andrews work with telomeres:
08-02-11 Bill Andrews - The Man Who Would Stop Time

And below is the link to a Bill Andrews video summarizing the state of the art in telomeres. Yes, I know it's over two hours long but it's worth watching if you are interested in the topic of anti-aging:
04-10-12 - Bill Andrews Telomere Video Summary
Science can obviously take time, but this finally appears to be a major step toward immortality...
11-29-10 - Harvard scientists reverse the ageing process in mice û now for humans
03-22-10 - BioTime Press Release and article
Wednesday, July 31, 2013
Burning Man 2012

First posted September 14th, 2012:
An amazing shot by Patrick Salter during Thursday night's thunder storm. The flame effects were completely separate from the actual lightning. Here are some other great links from the event:
Kj and Stefan capture the feel of Fertility 2.0 Video
FractalNation Village
Cameron Mickey Carlson on Playa
HuluCam Video - Usually this much movement will lose the audience. Strange how a thin piece of plastic creates a reference for the mind.
2012 Burning Man Screen Saver
There's a good shot of my art project, "Ride the Wind" in this excellent Quadacopter Tour of Burning Man 2012. Look for the large piece of white fabric floating on the wind off to the right between 1:45 and 1:55 into the film.
Best Video Summary
Great Time-lapse
Another WOW Drone View
Ethan's Video of the Man Burn shot from the back of our Ice Buggy. That's JB's head in the bottom left. Also note the people running from the fire twisters and the quadracopter zooming around. Great Burn video.
Ride the Wind Video
DeLano Photography
Tuesday, July 30, 2013
Burning Girl on the 4th of July, 2013
First posted 04-13-13:
Discover Burning Girl this 4th of July. Here's how:
If you've been to Burning Man you know you can't do it all, but when you get back home and look at all the pictures you discover so many things you didn't see. It makes you wonder if you attended the same event. I call this the Tao effect - your Burning Man experience is defined by the path you take across the playa. There is always much to miss.

And the very same thing seems to happen in the local Burner community. Even though the Reno area only has a few thousand Burners I constantly get surprised by some local project or place I've never heard of before. This was the case last night when Melinda and Rick invited me to a BBQ at Rancho Rico, about 100 miles from Reno, and ten miles down a gravel road south of Yerington.
To be candid, I HAD heard of the event they host at the location called Burning Girl, but it was always in a Shangri la sort of way, kind of a myth about a paradise out on the Walker river somewhere. To my regret, I hadn't chased down the myth until now. But I'm getting ahead of myself. Let me first describe the venue.

Rancho Rico
Rancho Rico is indeed on the Walker river, or it would be more accurate to say, the Walker river winds it's way through Rancho Rico. Even though the property is only a quarter mile wide, the river manages to log nearly a mile of turns through the cottonwoods and river brush. I'm told it takes 25 minutes to float from one end to the other. But floating the river is just the beginning of Rancho Rico's Tao.
Having been to Burning Man, Rick and Melinda have created a personal space consistent with many of the principles of the larger event. They have "theme areas" all over the property, each supporting a different experience, each encouraging a different mood.

There's a log house which is their main vacation residence. Inside it's a beautiful open design but otherwise the most conventional structure on the property, which says a LOT about everything else.
There's also a large barn with a shop well populated with machine tools along one wall. It's decorated in such a fine / rustic manner, it's nicer than many living rooms I've encountered. It's so nice, it almost makes you NOT want to turn on the drill-press.

Above is a large open loft apartment with a view of the mountains. It sleeps 8 and again, it's decoration is another experience in western art. This barn also has one of the "exposed" showers in the main shop area. Sometimes you just get too dirty to be shy.

Near the barn is an adult sized swingset - not to be missed when the stars are out. And at the front of the barn is "Mustang Sally" who's lights create a whole different drama at night. There also are solar trail lights on most paths (or soon will be).

There are fire pits, both gas and conventional since fire has to be carefully controlled. There's just too much available stuff to burn, and the fire department is too far away. Glo-poi for spinning is a requirement here.

There is a shaded massage and meditation area next to the river. As a matter of fact, with it's winding nature, MOST of the areas are next to the river in one way or another. For instance, the tee-pee camping area is also river front and nicely isolated.


There are multiple outdoor (and indoor) hot and cold showers, one of which has a beautiful mosaic created by Melinda. I think it's of Burning Girl. Or is it a self-mosaic? Or both?
There's an RV area with 100 amp service as well as four or five other hidden camping areas along this mile of river bank, one of which would be excellent for an isolated sound camp.
Up a secret trail is access to the "nude beach" on a sandy turn of the river. Other areas are limited to topless or clothed to keep it family-friendly.

And of course there's a hot-tub next to the river to provide contrast with the surging snow melt. But that's only in the winter. In the summer this river is controlled and fed by the Bridgeport reservoir so it stays reasonably high (2-3 feet) and warm all summer long - just what you need to float along.
Away from the river is the marriage pit. It's an amphitheater where Ric and Melinda were married. It's also an excellent camping or performing area more remote from the other camps.

The center-piece on the river is a stage for the musicians. This is where over the years they've hosted live rock and roll, bluegrass, raggai, jazz, blues as well as country AND western - just about every music except for droning dubstep (save it for the remote sound camp?).

Going around the river bend and into the woods is a shaded trail that surprisingly leads to a full-size old west saloon complete with a whore's loft (and bed). There's also a poker table and very impressive bar with hand-holds (why haven't I seen this feature before?).


Across the river on Ric's telephone pole bridge is Money Hill where the generous drop coins for children to "discover" later on. It reminded me of the "penny toss" I attended as a kid.

At the top of Money Hill is Ric's "grave site", again consistent with the wild west theme and worth the climb for it's view of the mountains and river valley to the east.

The final concession to fire is the Burning Girl which is actually a 10-foot metal sculpture of a female in a fire-safe area. On the Saturday of the camp-out this girl is loaded with straw and wood then set ablaze, which gets us to the event Melinda and Ric have been hosting for the last five years:
Burning Girl

Not having been to the event, I won't guess at the experience, but as you can imagine this venue seems like it would be a party all by itself - just add people. And when those people are participating artists, it seems that Rancho Richo would come alive with fun and wonder. My guess is, that's exactly what has happened each 4th of July for the last five years as Ric and Melinda invite their bay area friends out to the wilds of the Walker river.
But this year they want to mix it up a bit. They are looking for some local talent.
In the past the focus has been live music along with a kid-friendly family camp-out, and they plan to continue that. But this year in appreciation for the inspiration Burning Man has provided, Melinda and Ric would also like to extend the Burning Girl invitation to some of the Reno / Tahoe Burners. That will be their generous gift to our local Burner community.
I just returned from another organizational meeting and a few changes have been made. The event will be limited to 500 Burners for 2013. Also, only the dogs that have already been registered will be admitted. Finally, ATVs will only be allow for registered service work or art cars.
Here is a summary of the principles of Burning Girl:
No fee of any kind, this is a gift to the Burner community
Radical Self-expression - except no fire, guns or fireworks
Gifting of your art unconditionally through participation
Family-friendly - Topless sunbathing contained to the beach. Bottoms on!
Dogs - limited to already preregistered dogs, no new ones
Art cars - but very slow on property
ATVs - only for registered service or art cars at the event
Radical Self-reliance, use their resources in moderation
Communal Effort, be part of the solution, part of the event
Civic Responsibility - all activities in accordance with local, state and federal laws.
Decommodification - no commercial activities
This is a Leave No Trace event
Facebook Event Page
Register for the event here:
Attend Burning Girl
07-10-13 A summary of the experience from Melinda:
Another amazing Burning Girl !! Thank you for all the good energy, hard work and creative minds. So many people contributed to make this a success. I think Phillip Romero from the VooDoo Lounge said it best, our two families finally got to meet each other. This will be the last email where I differentiate the Reno/Tahoe Burners in attendance, from the Burning Girl community. From now on, we are all the Burning Girl Community. We were married in Empress Rosa's Rose Palace, celebrated with a parade, and a sealed the deal when Todd Mauldin and Vision lit the Steel Girl on fire together.
Ric and I received so many special gifts and were astounded at the gratitude expressed to us at every turn. The spirit this year was joy, humor, playfulness, and creative expression. The costumes, art cars and Theme Camps were a delight, and I was so happy to see so many cool people, activities, and experiences. We kept it kid friendly, the camps were left spotless, the property was treated with respect, and there were no major injuries!
There are so many people to thank that I am afraid to list them for fear of forgetting someone. Ric and I actually had time to relax and have fun this year. We partied! And that was because of all the hard work put in by all the volunteers, musicians, stage hands, clubs, and lounges. Rod Coleman really helped launch this marriage with his organizational skills, networking, site visits, blog postings, and communication with me — for months. We were tackling a pretty big merging of different cultures and yet, we pulled it off better than could be imagined! Thank you, Rod. Todd Mauldin and Phillip and Laura Romero created the Voo Doo Lounge again this year and it was better than ever with constant cocktails and socializing. The organized events were a big hit. Anna Lafferty and Vision organized the greeters station, which was heaven sent and a must for next year. Marie Gilbert’s Kid Camp was deeply appreciated. I got some really good comments from parents whose kids enjoyed the activities. And I want to make a very heart felt thank you to Sprocket and Vision who lead the work crew preparing our camps in 106 degree heat. They came out a week before the event, and stayed until every last shred of evidence was put back in place. Beth Alison Klein took over the medical area, and Danielle Gann-Lind took over rangers — both areas much needed and extremely important. Tim Hunter put up the spectacular Club Neu with amazing visuals, energy and sound. We loved it and hope you return next year. Snake Rattle and Roll Camp helped through out the event with Saloon pick ups and after party clean up. Pig Man and Tuba Man were stellar in leading the parade, NOLA Camp dazzled us with the New Orleans shrimp boil, Bill Lantz brought the good stuff to the wine tasting event, actors costumed up in the heat for the movie shoot, Playa Magic entertained with magic, Bernie made us smile with his puppets, and Snapnt Sound ran the stage with sound equipment so the amazing bands could rock us all weekend long. And for all the camps, I realize the trouble it takes to haul your art cars, theme camps, costumes, and mechanisms for distributing your gifts, to a camping trip. I want to thank everyone for their hard work, optimism, and enthusiasm. It was amazing to see the ranch come alive like a carnival of talent, happy people, and energy.
My 21 year old daughter, Catalina, has been to all six Burning Girls and she said it was the best one yet! I also talked to many other BG alumni, and everyone I asked agreed with Catalina. Before the event some feared the unknown and didn’t want Burning Girl to change. But Burning Girl 6 had the same magic it has every year. We still had the amazing bands playing in front of the river while we soaked up the sun in inner tubes, creative projects and giving people — There was just more of it. — More cool people, more fun, laughter, playfulness, costumes, experience camps, and more wonderfulness. I can’t tell you how many said they felt like they made some sincere new friends and were inspired to make their camps more artistic with costumes, gifts, and art cars next year.
I also talked to many first timers and asked them what they thought of Burning Girl. The consensus seems to be that they were blown away by our Burning Girl community. I think they imagined we were simply a big camping festival with live music. But we are much more. They were pleasantly surprised by the creativity, hard workers, collaborative spirit, good moods, mind-blowing beauty of the land, and vast amounts of talent. We will obviously have some kinks to work out as we grow and improve so please send me your feedback. What worked for you in particular? What was your favorite part? What still needs some adjusting and how can we make it better. How would you sum up your experience this year? I’d really appreciate the feedback.
We also need every attendee’s email address to keep them in the loop. If you registered and brought friends, please send me your friend’s email and forward this email. I will need names for credits in the movie too. Many people participated in the movie and I need the spelling of their first and last names. I will edit the movie over the next month and set up a Youtube link to view it and share it on the BG website and Facebook page. Also, email me your photos so we can add them to the master photo link on the website and share photos.
This year’s theme was gifting, and in that vein, the musicians gifted their music. Next year we celebrate the artists! The theme for BG7 in 2014 is the “Year Of The Artist”! We are going to have a donation button on the website and start raising money early so we can accumulate enough money to support our incredible artists. If everyone who attended BG6 donated 20 dollars we could help create some powerful art!
If you want to be part of leadership for next year please let me know. A few leaders were overworked and we still need to stream line that aspect. I would like the leaders to be a mix of the new comers and the old timers. We want to have leaders for the different areas of the ranch as well as traditional leaders: We need DPW to clear the land, Parking and Placement, Greeters, Medical, Rangers, Leave No Trace, volunteer coordinators, heads of the parade, movie, club, lounge, art projects, and Burn. Next year we are going to ask people which area they want to volunteer and direct them to coordinate with that leader.
Many people have asked Ric and I why we do this party. It’s not for money, it’s not for sex or power, and it’s certainly not for rest and relaxation! Burning Girl is a giant art project for us. It is a palette and every part of the event is our canvas. So we do it because we are artist and the party is all about the art. Art inspires and heals, and Burning Girl inspires and heals. Burning Girl is not simply a music festival or a rave camping event, and we have to be careful so that it doesn’t become either. We all have to protect the very special magic we have at Burning Girl and we can do that by keeping it to ourselves, and only share with the friends that we trust. We don’t want the registration to grow exponentially now that 450 people have attended. We don’t want Burning Girl to grow big. We want it to grow special. Burning Girl is yours now, and it is your responsibility to protect it like your child. Next year we are only allowing 100 more than this year. That feels right to Ric and I. So please do not spread the word on the Internet. Do not tell random people about it, and do not give away the address.
Once we establish our leaders for next year we can begin figuring out details for registration, tickets, placement, and fund raising. So stay tuned through out the year for news and videos.
You are Burning Girl. I now pronounce you, Husband and wife!
Burning Girl Six on YouTube
Even thought this is not an official Burning Man event and is in no way associated with the Burning Man organization, it would still be nice to have Rangers, a first aid tent and volunteer managers for other functions. So far we have volunteer leads for directing Gate, Placement, Music, Medical and Volunteers.
If you'd like to be part of this wonderful event on the 4th of July, click the registration button below and fill in your contact info.
Register
Any other questions, email:
If you'd like to be part of this wonderful event on the 4th of July, click the registration button below and fill in your contact info.
Register
Any other questions, email:
sudden.net at gmail dot com
First come, first on the invite list - limited to 500.
First come, first on the invite list - limited to 500.
Here are the details. Be sure to click through all the pages:
Facebook Event Page
Register for the event here:
Attend Burning Girl
07-10-13 A summary of the experience from Melinda:
Another amazing Burning Girl !! Thank you for all the good energy, hard work and creative minds. So many people contributed to make this a success. I think Phillip Romero from the VooDoo Lounge said it best, our two families finally got to meet each other. This will be the last email where I differentiate the Reno/Tahoe Burners in attendance, from the Burning Girl community. From now on, we are all the Burning Girl Community. We were married in Empress Rosa's Rose Palace, celebrated with a parade, and a sealed the deal when Todd Mauldin and Vision lit the Steel Girl on fire together.
Ric and I received so many special gifts and were astounded at the gratitude expressed to us at every turn. The spirit this year was joy, humor, playfulness, and creative expression. The costumes, art cars and Theme Camps were a delight, and I was so happy to see so many cool people, activities, and experiences. We kept it kid friendly, the camps were left spotless, the property was treated with respect, and there were no major injuries!
There are so many people to thank that I am afraid to list them for fear of forgetting someone. Ric and I actually had time to relax and have fun this year. We partied! And that was because of all the hard work put in by all the volunteers, musicians, stage hands, clubs, and lounges. Rod Coleman really helped launch this marriage with his organizational skills, networking, site visits, blog postings, and communication with me — for months. We were tackling a pretty big merging of different cultures and yet, we pulled it off better than could be imagined! Thank you, Rod. Todd Mauldin and Phillip and Laura Romero created the Voo Doo Lounge again this year and it was better than ever with constant cocktails and socializing. The organized events were a big hit. Anna Lafferty and Vision organized the greeters station, which was heaven sent and a must for next year. Marie Gilbert’s Kid Camp was deeply appreciated. I got some really good comments from parents whose kids enjoyed the activities. And I want to make a very heart felt thank you to Sprocket and Vision who lead the work crew preparing our camps in 106 degree heat. They came out a week before the event, and stayed until every last shred of evidence was put back in place. Beth Alison Klein took over the medical area, and Danielle Gann-Lind took over rangers — both areas much needed and extremely important. Tim Hunter put up the spectacular Club Neu with amazing visuals, energy and sound. We loved it and hope you return next year. Snake Rattle and Roll Camp helped through out the event with Saloon pick ups and after party clean up. Pig Man and Tuba Man were stellar in leading the parade, NOLA Camp dazzled us with the New Orleans shrimp boil, Bill Lantz brought the good stuff to the wine tasting event, actors costumed up in the heat for the movie shoot, Playa Magic entertained with magic, Bernie made us smile with his puppets, and Snapnt Sound ran the stage with sound equipment so the amazing bands could rock us all weekend long. And for all the camps, I realize the trouble it takes to haul your art cars, theme camps, costumes, and mechanisms for distributing your gifts, to a camping trip. I want to thank everyone for their hard work, optimism, and enthusiasm. It was amazing to see the ranch come alive like a carnival of talent, happy people, and energy.
My 21 year old daughter, Catalina, has been to all six Burning Girls and she said it was the best one yet! I also talked to many other BG alumni, and everyone I asked agreed with Catalina. Before the event some feared the unknown and didn’t want Burning Girl to change. But Burning Girl 6 had the same magic it has every year. We still had the amazing bands playing in front of the river while we soaked up the sun in inner tubes, creative projects and giving people — There was just more of it. — More cool people, more fun, laughter, playfulness, costumes, experience camps, and more wonderfulness. I can’t tell you how many said they felt like they made some sincere new friends and were inspired to make their camps more artistic with costumes, gifts, and art cars next year.
I also talked to many first timers and asked them what they thought of Burning Girl. The consensus seems to be that they were blown away by our Burning Girl community. I think they imagined we were simply a big camping festival with live music. But we are much more. They were pleasantly surprised by the creativity, hard workers, collaborative spirit, good moods, mind-blowing beauty of the land, and vast amounts of talent. We will obviously have some kinks to work out as we grow and improve so please send me your feedback. What worked for you in particular? What was your favorite part? What still needs some adjusting and how can we make it better. How would you sum up your experience this year? I’d really appreciate the feedback.
We also need every attendee’s email address to keep them in the loop. If you registered and brought friends, please send me your friend’s email and forward this email. I will need names for credits in the movie too. Many people participated in the movie and I need the spelling of their first and last names. I will edit the movie over the next month and set up a Youtube link to view it and share it on the BG website and Facebook page. Also, email me your photos so we can add them to the master photo link on the website and share photos.
This year’s theme was gifting, and in that vein, the musicians gifted their music. Next year we celebrate the artists! The theme for BG7 in 2014 is the “Year Of The Artist”! We are going to have a donation button on the website and start raising money early so we can accumulate enough money to support our incredible artists. If everyone who attended BG6 donated 20 dollars we could help create some powerful art!
If you want to be part of leadership for next year please let me know. A few leaders were overworked and we still need to stream line that aspect. I would like the leaders to be a mix of the new comers and the old timers. We want to have leaders for the different areas of the ranch as well as traditional leaders: We need DPW to clear the land, Parking and Placement, Greeters, Medical, Rangers, Leave No Trace, volunteer coordinators, heads of the parade, movie, club, lounge, art projects, and Burn. Next year we are going to ask people which area they want to volunteer and direct them to coordinate with that leader.
Many people have asked Ric and I why we do this party. It’s not for money, it’s not for sex or power, and it’s certainly not for rest and relaxation! Burning Girl is a giant art project for us. It is a palette and every part of the event is our canvas. So we do it because we are artist and the party is all about the art. Art inspires and heals, and Burning Girl inspires and heals. Burning Girl is not simply a music festival or a rave camping event, and we have to be careful so that it doesn’t become either. We all have to protect the very special magic we have at Burning Girl and we can do that by keeping it to ourselves, and only share with the friends that we trust. We don’t want the registration to grow exponentially now that 450 people have attended. We don’t want Burning Girl to grow big. We want it to grow special. Burning Girl is yours now, and it is your responsibility to protect it like your child. Next year we are only allowing 100 more than this year. That feels right to Ric and I. So please do not spread the word on the Internet. Do not tell random people about it, and do not give away the address.
Once we establish our leaders for next year we can begin figuring out details for registration, tickets, placement, and fund raising. So stay tuned through out the year for news and videos.
You are Burning Girl. I now pronounce you, Husband and wife!
Burning Girl Six on YouTube
Wednesday, June 26, 2013
Minicars Get Maxied
Posted to Car and Driver Forum on 07-04-06
Csaba Csere, you hit the nail on the head with your August Column, "Minicars? I don't see no stinking minicars". But you stopped short of defining the problem. And you didn't clarify the solution. Still, your examples pointed us in the right direction.
Just like the forties changed the way cars looked, the seventies changed the way they worked. The gas crisis gave us the first major advancement in functional body design since the twenties.
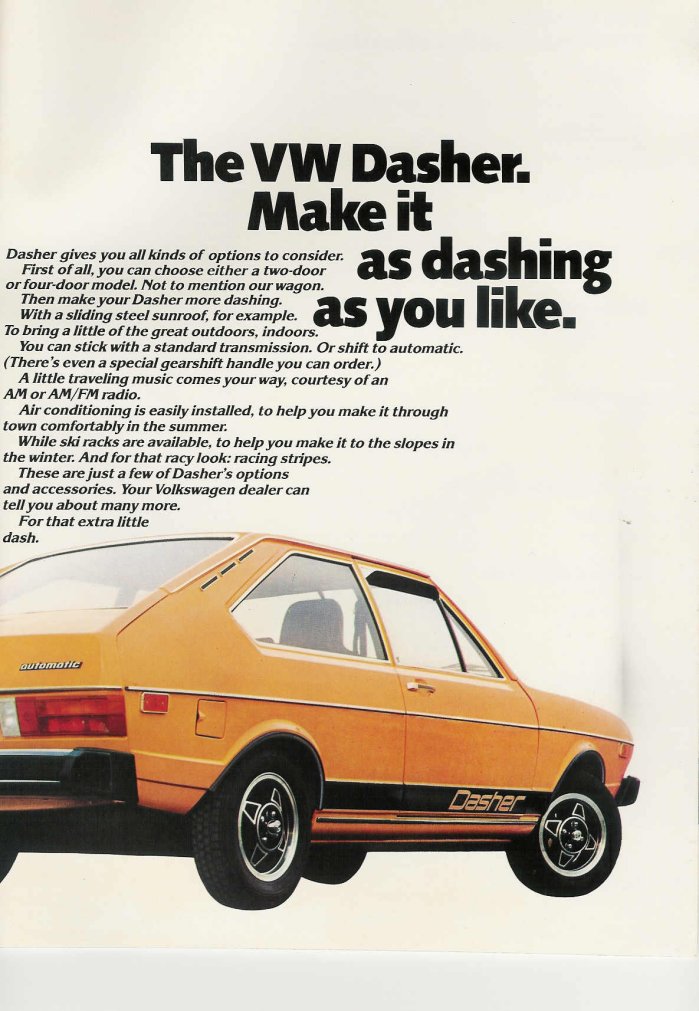
Like you, I recall the mid-seventies well. Until then I owned American cars and loved the torque of the small block V-8s. Then I compared my Chevy to the specs for the 1974 VW Dasher. I was impressed. When I traded up, I discovered how much weight was a factor in acceleration, handling, braking and economy - even with less power. I became addicted to the idea of light and efficient cars.
The Dasher was so much fun, I bought a Scirocco when it came out. It was a fantastic ride at the time. Two years later I traded in the Dasher for a 1978 Rabbit for my wife. At 1880 pounds, it got 38 MPG with reasonable performance.
Giorgetto Giugiaro made history with these little cars in creating an excellent light-weight package that still held five people when needed. The VW Rabbit was state of the art in 1978. Unfortunately, art doesn't advance it's state at a steady pace.
Later I bought a 1985 Honda CR-V. It weighted only 2000 lbs and had lots of room. Twice, I actually hauled a standard sized refrigerator (no I couldn't get the tail-gate closed). This car also got mileage in the high thirties, but not better.
And now Toyota, Honda and Nissan are all introducing new economy cars. But they still only 38 MPG! And Nissan will struggle to get that.
What's the deal? Has there been no technical progress in the last 30 years? No, that's not it. Engines and transmissions are definitely more efficient. Could it be the few hundred extra pounds these "small" cars have gained? Yep. The improved drive-train efficiency has been totally eclipsed by the increasing weight of the cars. New does not always mean improved.
Think what could be done if we dropped window lifts, electric door locks and butt warmers. Then scale the whole car back so everything can be lighter. Focus on active safety instead of building tanks that tend to roll over anyway.
If Honda combined the body of the 1985 CR-V with today's drive-trains, they could be getting 50 MPG instead of only 38 in that little fat Fit. Don't get me wrong. Not withstanding a name borrowed from a rabid dog, Honda has done a wonderful job on Fit's package. They get a lot in a reasonable space. It just WEIGHTS too much.
Another "Mini" that's been "maxied" is the one from BMW. A car that small should weight half as much, and get twice the mileage. They could have at least IMPROVED on the original after all this time.
And why did Toyota replace the Echo weighing 2055 lbs with the Yaris which weighs 2326 pounds? Two hundred pounds LIGHTER than the Echo and it would have come in at 50 MPG instead of the high thirties. It may not be obvious, but 271 pounds can make a LOT of difference in such a small car.
It seems these masters of auto technology have forgotten the basic purpose of a car - to move a human from one place to another. How many tons of steel does it take to deliver a 150 pound person? With all the new light-weight materials at hand, we should have an effective ONE thousand pound car by now.
I also owned a 1975 MG Midget (I told you I got excited about light cars). At only 1300 pounds, it was so much fun to drive, I forget the mileage. One evening I left the lights on and had to push start it in a 30' driveway. Yes, I got it started... AND stopped before hitting the garage door. Try THAT with their Yaris, Fit or Versa.
But it's not all bad news. Lotus has shown the way forward in the sports segment with the new Exige. Colin Chapman would be proud to see them living out his creed - "Simplify and add lightness". WHEN will the rest get a clue? And more importantly, WHY haven't they done it yet?
Do they own too much oil stock? Would it upstage their complex hybrid solutions? Are the Fed safety trolls just too hard to deal with? There are lots of good questions at the heart of this problem. And we're about to be in desperate need of some good answers.
Someone has to lead the charge.
Csaba, you have their ear.
Tell 'em who we are.
10-29-09 Here's some good data on weight effects of milage...
Drill into the PDF from the link above. Also included are the weight's effects on performance, as well as showing how much weight DOESN'T matter much once you exceed 65 MPH. Great stuff.
04-28-10 Lotus comes out swinging for lighter, more efficient vehicles
Finally, someone conclusively demonstrates the key to automobile efficiency is light weight - the video says it all.
09-16-10 Ultra-Light Cars Reap Rewards of X Prize
06-26-13 New VW Golf TDI BlueMotion is 'most fuel-efficient ever' with 73.5 mpg
Wednesday, June 19, 2013
Rating the Tahoe Rim Trail - a Critical Review
First posted 12-27-2007, updated 06-19-13

01 TRTA Thru Hike - click to enlarge
Each year I look for a hiking challenge. For 2007 it was to be The Tahoe Rim Trail, which has been on my list since it opened in 2001. It's a high rugged 168 miles, broken by eight trail-heads at the passes into the Tahoe basin. The sections range from 13 to 31 miles with one to three thousand foot climbs and drops. Most sections are a good work-out even for experienced hikers. I'd hiked a bit when I'd been near one of the trail-heads, but never a whole section. Now I wanted to do the WHOLE thing at one time.
So, what does "at one time" mean? Even the fastest humans can't hike 168 miles in a day. The Tahoe Rim Trail DOES have organized 100 mile hikes where the fastest runner takes well over twenty hours to do a part of it. So if it takes more than a day, then how many? It's all a matter of how you want to manage resources, rest and recovery - or not.
Many tourist are forced by time constraints to play mule with a heavy pack and do it as a through hike in less than a couple of weeks. The above map for the TRTA Thru Hike is a good example.
But most people don't have the time or training to complete the whole thing. And if NOT the whole thing, which part? THAT is the point of this post. The official website presents it ALL as one grand experience, but it's not. Like most things, some parts are better than others. I'll give you my opinion and why.

02 The Critic
The Plan
Neither making it in one hard run, nor playing mule is my idea of a good time. I like to travel light and fast, but still slow enough to take some pictures and enjoy the views and experience.
I'm also fortunate enough to live in Reno so I didn't have to do it in a single vacation or even a single month. But I DID want to complete it in a single season, mostly for the personal challenge. I decided to break it up over a period of weeks so I could choose my weather and also work it into my schedule.
It's handy living close to the objective. You can look out the window and decide if it's a good day to hike. Last year I crossed the Grand Canyon in a single day, but the schedule was touch and go with the weather, timing and the driving. This year I was glad I didn't have to drive a thousand miles then take a chance of getting snowed out.
As it turned out, I was wrong on both points. We drove almost TWICE that far by the time it was done, and there WAS a chance of getting snowed out. All the extra driving was because there's no effective public shuttle for each section of the Tahoe Rim Trail (now some shuttles - 2013). This means we needed TWO cars driving the loop distance around each section from Reno and back. You do the math; I'll just guess. I figured about 100 miles per loop, times nine sections, times two cars which equals about 1800 miles. Fortunately An wanted to do this hike too, so I had the extra driver I needed. Plus we had other hikers on some sections.

03 An
The other planning challenge was deciding which sections to do when, and in what direction. We started with the lower altitude and the east side because it gets less snow. We'd do the west side and the high ground after the snow melted. This is why the sections as described below are out of clockwise order starting from Tahoe City as defined in the book below. And since I perfer downhills, we hiked some of them in the reverse direction which may be a little confusing if you're comparing my descriptions to those in the book.
Resources
Tahoe Rim Trail Book
I bought a copy of "The Tahoe Rim Trail" by Tim Hauserman and read it just before we started. It's the best source of information on the details of the trail and I recommend it, but it is missing consistent stats on each hike. Tim did a good job on the overall distance, but was hit and miss with altitude and way-point information. I'll that info as I do each hike.
Tahoe Rim Trail Association
Looking for better stats, I Googled the topic and found almost nothing consistent over the whole course. Sure, there's the official Tahoe Rim Trail site with its PDF maps, but nowhere does their site allow me to copy and paste trail-head directions or planning stats into my Treo. And the site is VERY slow and clumsy (This is still the case in 2013 though the maps are a little better).
I should note there's some good on-line information on some of the independent race courses, but that's only a small part of the whole course.
The best data came from the maps they leave at the trail-heads, but of course you can't get at them until you're on the trail so they are useless for planning. My favorite map for the area is the "Lake Tahoe Trail Map" from Adventure Maps. It's an excellent color topomap on durable coated paper with lots of information about the area.
Lake Tahoe Trail Map
From these sources (and my pedometer), I've collected my own Tahoe Rim Trail statistics and provide them at the beginning of each section description below. Copy and Paste as you like.
This blog post is in no way an attempt to create a condensed version of Tim's objective book. In contrast, I've tried to provide a short, simple yet SUBJECTIVE rating of my experience on each hike. I hope you find it useful.
Hike 1, Section 1 - Brockway Summit to Tahoe City
Brockway Summit - Take Highway 267 from Highway 28 on the north shore to the paved parking area on the left one mile south of Brockway Summit and at Forest Service Rd 16N56).
Tahoe City - From the junction of Highway 28, take Highway 89 toward Truckee and turn right on Fairway Drive. Go 0.2 miles to the Community Center and trail-head.
Distance = 19.2 miles
Net climb = 800 feet
Net descent = 1500 feet
Elev Miles Location
7000 0.0 Brockway Summit
7760 6.7 Watson Lake
7754 12.2 Painted Rock
7550 15.1 Cinder Cone
6300 19.2 Tahoe City
Since the first section in the book is also the lowest and mostly snow-free, we'd hike it first, but in the reverse direction to enjoy the drop in altitude. At least that was the theory. We started at Brockway summit at about 8:00 A.M., June 3rd, 2007.
The day started with some high clouds which made for a pleasant hike. We'd got more sun in the afternoon but overall had good weather.
Soon we encountered our first mountain biker and would see many more during the day. The "Fiberboard Freeway" (named for the logging company that created it) parallels and crosses the trail. This makes it easy for the bikers to ride up the road and down the trail, and I have to agree, there were some very nice long down-hill stretches for bikes so watch your back going this direction.
There was actually a fair amount of bike traffic going both directions in spite of the technical ground. One couple on bikes passed us but were so slow on the rocks we passed them again. We then traded the lead several times over the next couple of miles. The ground was THAT bad. They finally took off once we dropped down the hill a bit and the trail got fast.

04 Snow Plant
The nicest part of the hike, were all the snow flowers - we had perfect timing being just below the melt-line. I've only included a couple photos, but if snow flowers are on your list, this section in early June is the place to be.

05 Snow Plant
One description of this section says, "Panoramic views of the High Sierra, the Truckee River Canyon and Lake Tahoe can be seen from this trail.". And it's technically true, but it's also an example of over-selling. These views are all at a very FEW specific points and there's little but trees in between.
As an example, there's a view of Mt. Pluto looking north near the high point of the hike, but only for about 22 feet of the trail. Watch carefully or you'll miss it. On this hike, every view counts. The rest of the time you're looking at trees and trail. There are also surprisingly few granite boulders or other distraction for this long of a distance around Tahoe. OK, there WAS Lake Watson and a few big rocks after that which were all very nice.
And we did find one outcropping with a view for our morning break, but delayed lunch over an hour looking for another. Finally, we gave up and ate in the trees watching the bikes go by. We could have been in just about any forest anywhere. Section one was not what I expected of a "rim" trail in terms of entertainment.
And it wasn't just because it was short on good views. This hike goes to the bottom of my list because it spends most of its time in the gaining and losing altitude a couple of hundred feet at a time... over and over and over and over. You never seem to get anywhere in elevation. The 800 foot gain and 1500 foot drop is deceptive, it's more like 3000 feet in minor ups and downs.
The trail-bed was the other problem. If you're a casual hiker, you might think I'm being a bit sensitive here, but it can be an important factor. Anyone can hike a couple of miles on virtually any ground. But if your objective is to average 20 miles a day, and do it fast, the ground can make a huge difference. Plus if you have to constantly watch your feet, you visually miss most of the hike. That's why I include a trail rating in each summary.
Even though the first few miles of this section were on fairly nice ground, most of the rest was poor to bad. And the last few miles were VERY rocky and a challenge for each step. The granite ground required us to keep our heads down watching foot placement to avoid ankle injury. This was some of the worst trail-bed of the entire basin - especially the last couple of miles. The rock was sharp enough to slice tires and shoes. We encountered no bikes on this part. It was too nasty even for technical riding.
Obviously, I wasn't impressed with this hike. By the end of the day I was even having doubts about the entire project. Was this section typical? Fortunately, no. It was the worst. Or maybe I was having a bad day. Let me know what you think.
We made it to Tahoe City at 3:20 in the afternoon for an average speed of 3.22 MPH figuring an hour for lunch and breaks. It was a good workout, but not a great hike. If you can only do one segment of the Tahoe Rim Trail, don't make it this one.
Unless you're on a bike.
Ratings out of 10
Trail - 2
Views - 3
Experience - 2
Overall - 3
Hike 2, Section 3 - Tahoe Meadows to Spooner Summit
Tahoe Meadows - Take Highway 431 from Incline Village to one half mile below the summit and the paved parking area on the right.
Spooner Summit - Go east from Stateline to the summit on Highway 50.
Distance = 23.1 miles
Net climb = 400 feet
Net descent = 2000 feet
Elev Miles Location 8800 0.0 Tahoe Meadows
7760 9.2 Tunnel Creek Road
8680 13.2 Christopher's Loop Lookout
8200 16.2 Hobart Road
9214 17.1 Snow Valley Peak
7150 25.5 Spooner Summit
Since section 2 was still under snow, we next hiked section three. After the last hike, I was ready to be impressed. And I was. This section turned out to be the very opposite of the first.
The trail bed was excellent; the views, fantastic; the grade entertaining. I remember thinking as I hiked along, this will be my favorite, which was crazy considering it was only my second hike out of nine. But that's how much contrast there is between the 1st and 3rd sections of the Tahoe Rim Trail. Besides, I was right. It WAS the best!
Since it was a longer hike, we got started at 7:30 A.M. on June 9, 2007. The weather was much like the first hike, except the high layer of clouds came over in the afternoon instead of the morning.
The hike started off fairly average with very small descents and climbs. There was a nice little creek at about 2.9 miles but we packed our water so didn't stop.

06 Washoe Lake
The trail soon turned level to slightly down along a ridge that provided views into Nevada on the left, dramatically overlooking Washoe Lake. This was followed by views off to the right of Lake Tahoe and Incline Village. The trail-bed was soft and fast. The trail and views continued like this for miles, except sometimes the views were on both sides at once. Now THIS was my idea of a rim trail - great weather, fast trail, fantastic views and a slow descent.

07 Ski Lift
At six miles we passed the top of a ski lift coming up from Incline Village. But the season was over. It was so quiet we could sometimes hear the highway from town even though it was 2500 feet below and at least a mile away.
This part of the Tahoe Rim Trail is only supposed to have bike traffic on even days but there were plenty of bikes anyway. As a matter of fact, there were far more bikes than hikers on both sections so far.

08 Twin Lakes
I suppose I would have gotten bored if these conditions had gone on for the entire hike, but soon it changed. At 9 miles we drop down to Twin Lakes which was really one small lake and one adjoining mud hole. Since this was the wettest part of the year, I couldn't imagine any water being left by late fall. The Twins are definitely over-rated as lakes.
Next came a dramatic and steep switchback climb of about 700 feet in just a couple of miles. Now this was my kind of hill. When you climb, you get somewhere! Here is where we met five runners practicing for the Rim Trail Ultra Marathon, and of course, LOTS more bikes but no back packers or day hikers like us.
At the top of the hill was the turn-off for Christopher's Loop trail which is an extra 1.2 miles round trip. Now after a steep climb you might not be in the mood to add another mile to the trip, but the book said not to miss it. And the book is right.

09 Sand Harbor
For some reason I love vertical views. I think that's why I enjoy Zion so much. Maybe it's that edge of danger. Christopher's Loop is almost that kind of view. It goes out to the the edge of steep granite drop away, dramatically over-looking Sand Harbor about 3000 feet below. It's one of the most beautiful settings I've ever seen on ANY hike. With the clear water, sandy hook anchored with huge granite rocks, and the whole thing framed by the rest of Tahoe, it's worth the walk. It was definitely the high point of the day. It's also a great place to stop for lunch, so we did.

10 Marlette and Tahoe
Back on the main trail we did another scenic alternate above Marlette Lake. It wasn't much farther and definitely worth it. It seemed as if this ridge (and certainly the trail) were put there to present the lake. Near the dam, Marlette almost produces the infinity pool effect with Tahoe below. More WOW moments for sure.

11 Marlette and Tahoe
From there we dropped down to Hobart road then climbed up to the top of Snow Valley Peak. It was the second good workout of the day and provided an even more panoramic view of the whole area including most of Lake Tahoe.

12 Snow Valley Peak
This was the highest altitude of the hike at over 9000 feet and also where we got passed by another guy training for the Ultra Marathon. His dog was packing his supplies. We stopped and talked a bit. He was waiting for his friend to catch up. Soon he went on but we stopped for an afternoon snack. Not long after, his friend passed us at a slower pace. You have to admire these guys. They were on their third section for the day. We had only done part of one and were now getting tired. This is where this hike really won my heart. The rest of it was down hill. From here the trail dropped into the woods for a steady descent down to Spooner Summit.
We finished at 5:20 PM and my pedometer had logged 25.5 miles with our side trips. We had averaged only 2.5 MPH but I think it was because we spent so much time with our mouths hanging open.
I should point out, this is no modest hike for most people. It's almost a marathon. And if you check the profile, you'll see it has well over 2000 feet of climb - but you get somewhere in the process. Yep. This is my favorite hike of The Tahoe Rim Trail. It's where the concept lives up to it's name.
But there IS a close second.
Ratings out of 10
Trail - 10
Views - 10
Experience - 10
Overall - 10
Hike 3, Section 4 - Kingsbury North to Spooner Summit

13 An, Trav and Ry
Kingsbury North - Take Highway 207 from Stateline to just short of the summit and turn north onto North Benjamin Drive then onto Andria Drive and go two miles to the trail-head at the end of the road.
Spooner Summit - Go east from Stateline to the summit on Highway 50.
Distance = 12.2 miles
Net climb = 1000 feet
Net descent = 1600 feet
Elev Miles Location
7780 0.0 Kingsbury North
8500 5.2 Genoa Peak Junction
8800 7.3 South Camp Bench
7150 12.2 Spooner Summit
June 17th was Father's day so I got to pick the event. Two of my sons, Travis and Ryan actually LIKE to hike so of course my choice was another section of the Tahoe Rim Trail. I decided to give them a break by selecting the shortest at 12 miles. I also decided to hike it in the counter-clockwise direction again to get more down hiking than up.
We left home at 7:30 and got the cars shuttled by 9:00 A.M. Since this is the shortest hike, an early start didn't matter.

14 Emerald Bay and Desolation Peaks
The section starts with a nice view of Stateline and the south shore of Lake Tahoe framed by the Desolation Wilderness peaks behind. Later, about half the lake comes into view at one turn or another, but mostly behind your back.
This view continues on and off through the trees for the first few miles as the trail climbs about 1000 feet to South Camp. The trail bed was average to good and the climb steady. But the ground was not very dramatic or entertaining.
About a mile before the top, Genoa Peak becomes obvious with it's rocky top and the usual collection of equipment shelters and antennas. There's a side road for those who wanted to climb it but my youngest had already vetoed any significant side trips, so we pushed on.
The breakout to a long exposed ridge happens fast. The view is panoramic and vivid, now presenting most of the lake. A little farther takes you to a nice log bench and a great place for lunch at about half way. It was only 11:40 but we ate anyway.

15 Bench
The second half was steeper downhill but that was the only advantage. It was mostly in the trees with just an OK trail bed, but still not a problem. There were few views and not much else to distract you from the path anyway.

16 Travis
The boys did a great job with Travis leading the finish at 1:46 PM. No one was very tired. My pedometer showed 12.8 miles for 3.2 MPH excluding lunch. Perhaps I should have chosen a longer Section - maybe next Father's Day.
This section might actually be more fun in the clockwise direction so you could really enjoys the views of the second half and a more gentle down-hill finish. Plan accordingly.
Ratings out of 10
Trail - 7
Views - 5
Experience - 8
Overall - 6
Hike 4, Section 2 - Tahoe Meadows to Brockway Summit

17 Relay Peak
Tahoe Meadows - Take Highway 431 from Incline Village to one half mile below the summit and the paved parking area on the right.
Brockway Summit - Take Highway 267 from Highway 28 on the north shore to the paved parking area on the left one mile south of Brockway Summit and at Forest Service Rd 16N56).
Distance = 18.9 miles
Net climb = 1600 feet
Net descent = 3400 feet
Elev Miles Location
8800 0.0 Tahoe Meadows
9400 2.5 Mt Rose Junction
10388 4.3 Relay Peak
9420 7.7 Mud Lake
9340 9.1 Rose Knob
8400 14.6 Martis Peak Junction
7000 18.9 Brockway Summit
We got started at 8:30 on June 23, 2007. Travis joined us for this section as well; Ryan declined. This one would be more of a workout and he wasn't ready.
We hiked the road to relay peak and got there by 10:00. It was a fast start and fast climb. We enjoyed our morning break with the highest views of the entire Tahoe Rim Trail. There was a southwest breeze and the air was clear. You could see tens of miles in every direction. The only thing above us was Mt. Rose. But not by much.

18 Incline Village

19 Most of Tahoe

20 Crystal Bay
By Mud lake we had gone back south far enough that we could see the car again. It was a big spiral climb and seemed like we hadn't gotten far in all those miles. From here we worked our way down the ridge to the west on rock and D.G. (Decomposed Granite) with only a few small trees now and then. As we dropped down, the wind picked up.

21 Outcrop

22 Travis

23 Mule Ears
When we turned west, most of the trail is exposed to the south, and the wind blew hard. I started looking for a more protected spot for lunch. It took a while, but we found a spot on the lee of an outcrop about a mile past Rose Knob.
The wind was howling above our heads as we watched another group of day hikers come up out of Incline. This was a rare event. We went for miles without seeing anyone else. At least until we got near the end. Bikes were not allowed in the Mt. Rose Wilderness.

24 Angora Fire Starting
Not long after lunch we dropped into the trees with occasional views. The wind was up to about 40 MPH. At 2:40 I noticed smoke at south shore - not a good sign. It started from a campsite and turned into the Angora fire, the biggest Tahoe had seen in years. It destroyed 325 structures including 254 homes, and burned 3100 acres. It took a week to control. We got to watch it blossom into a huge cloud of smoke 25 miles away.
Travis lead the finished this time too. He got to the car at just after three o'clock for 3.1 MPH not including lunch. This section starts with a good workout and finishes with a lot of downhill. I think we picked the right direction. Like other sections, it starts with panoramic views and ends with a walk in the trees.
Except for the wind, it was a great hike.
Ratings out of 10
Trail - 6
Views - 10
Experience - 7
Overall - 8
Hike 5 - Section 8 - Barker Pass to Tahoe City

25 Barker Pass Trail-Head
Barker Pass - Go south from Tahoe City on Highway 89 for 4.25 miles and turn right onto Blackwood Canyon Road (Forest Service Rd 15N38). Go west up the hill to the summit and trail-head at 7.2 miles.
Tahoe City - From the junction of Highway 28, take Highway 89 toward Truckee and turn right on Fairway Drive. Go 0.2 miles to the Community Center and trail-head.
Distance = 16.7 miles
Net climb = 800 feet
Net descent = 2200 feet
Elev Miles Location
7650 0.0 Barker Pass
8500 4.8 TRT Turnoff
6530 11.5 Ward Creek Blvd
6300 16.7 Tahoe City
With lots of fire, smoke and traffic on the south end of the lake, I decided to do the last in the book and a northern section the following weekend.
Travis joined us again. The three of us got started under good weather (well, except for the smoke) at about 9:00 A.M. on June 30, 2007.

26 Typical Path

27 Steep View
This hike too started high and ended low. The first half had a vivid setting with big trees and steep rock formations, along with views of the Granite Chief Wilderness, but only a couple of Lake Tahoe.

28 Blue Grouse (click to enlarge)
The first five miles were also the Pacific Crest Trail and stayed mostly high and dramatic. Then the Tahoe Rim Trail branched off and headed down a set of steep granite switchbacks to Ward Creek where it went into forest. That's where we saw what I'm told was a Blue Grouse just before we stopped for lunch.

29 Life and Death
The rest of the hike was along this creek or in the trees and it started getting warm. It turned out to be the hottest hike of the entire project but only in the 80s. The shade improved but with rolling climbs and descents through the forest. And it kept getting warmer. It was nice to get to the Truckee River and watch the rafters go by as we finished up at Tahoe City.

30 Truckee River
The first half of this last section is a beautiful hike with classic Sierra granite steps and trees. The second half is creek-bed and shaded forest. In sum, it was a just above average for the Tahoe Rim Trail.
Ratings out of 10
Trail - 6
Views - 6
Experience - 5
Overall - 6
Hike 6 - Section 6 - Big Meadow to Echo Summit
Big Meadow - From Highway 50 at Myers, go south on Highway 89 5.3 miles to Big Meadow camp ground and trail-head on the left.
Echo Summit - Go west from Myers to the summit on Highway 50.
Distance = 15.3 miles
Net climb = 1700 feet
Net descent = 1600 feet
Elev Miles Location
7300 0.0 Big Meadow
8420 2.6 Round Lake
8380 4.9 PCT Junction
8650 7.0 Showers Lake
9000 8.9 Little Round Top Jct
7380 16.7 Echo Summit
The weather was getting hot, plus I got distracted. We had done over half the project in only a month. I figured we had plenty of time. As it turned out, I was nearly wrong. During July and half of August I was busy with Burning Man projects and didn't do any hikes.
In mid-August, An mentioned the Sierra Club scheduled one of the sections we hadn't completed. A friend of An's named Bill was also going. This would make the car shuffle easier and we'd meet some new people. She signed us up.

31 Sierra Club
We met in Reno at 6:00 A.M. on August 18 and car-pooled up to Big Meadow by 8:15. There were nine of us total. Normally, I'm not into large groups. If someone's slow, it can drag the whole experience down. Fortunately, this was only 15 miles and everyone was experienced. We had a great time.

32 Cliffs

33 UN-Round Lake

34 Conglomerate
As for valid names, we quickly learned the Meadow was indeed Big, but the first Lake wasn't Round at all. The trail was nice and there were HUGE chunks of conglomerate in the forest - very interesting. There were also cliffs above us to the east which appeared to be made of the same stuff. This section had more hikers and campers than any other section of the Tahoe Rim Trail. I think it was because of the lakes being close to the trail-heads. The lakes are where everyone was camped.

35 House and Barn at Meiss Meadows
Not far past Round Lake we joined the PCT at Meiss Meadows, which I guess is why we didn't see any bikes on this section. At the junction was a rare house and barn with some horses and dogs at home.

36 Showers Lake
We continued on to Showers Lake where some in the group filtered water. An, I and Bill had lunch. The rest of the group went to the top of the hill for lunch. We caught up after Bill had a swim. The weather was beautiful.

37 Hoo Doos
Above Showers Lake the views became panoramic alpine with lots of wide open areas. We caught up with the rest of the group at the top of the hill where we all headed into forest and the rock changed to granite.
There were a couple of fences to cross in this section but the trail was nice until we began a steep descent where it became very rugged and dramatic granite steps.

38 Tahoe Airport
There was one EXCELLENT view-point on a granite slab the size of a barn. It over-looked the Little Truckee and the south end of Lake Tahoe. This was one of the best views of the summer.
The rest of the hike was pretty quick and mostly forested ending a nice day in the Sierras. We got done about 4:30 for just under 2 MPH, but with lots of breaks and a long lunch.
Ratings out of 10
Trail - 7
Views - 7
Experience - 7
Overall - 7
Hike 7, Section 5 - Kingsbury South to Big Meadow

39 Kingbury
Kingsbury South - From just west of Kingsbury Summit go south 1.5 miles on Tramway Drive to the Tram parking lot. The trail-head is literally at the Tram.
Big Meadow - From Highway 50 at Myers, go south on Highway 89 5.3 miles to Big Meadow camp ground and trail-head on the left.
Distance = 23.2 miles
Net climb = 2200 feet
Net descent = 2400 feet
Elev Miles Location
7520 0.0 Kingsbury South
8820 5.1 Monument Pass
9100 8.8 Star Lake
9730 10.7 Freel Peak Jct
8700 13.7 Armstrong Pass
7300 23.2 Big Meadow
Because of Burning Man, we didn't get back to hiking until September 9, 2007. I hoped we still had time for two more hikes before the weather turned bad.
Dave Orel joined us on part of this hike. He didn't want to do the whole distance so he planned to take a short cut down to Fountain Place Road at Armstrong Pass. We shuttled the cars accordingly.

40 Unicycle Guy
We got started at 9:20 with a steep climb and a surprise. Even though bikes are allowed on this section, we didn't see any. But we DID see a UNIcycle. And I got a picture because I'm sure no one would believe me. I am constantly entertained by the range of human behavior. I don't know how far this guy went, but I'm impressed he was there at all. He was on a bad stretch of ground and was going far slower than a walk working his way over the rocks. His example was quite inspiring.

41 Smoke in Nevada
We had a pretty good climb during the first five miles with average trail conditions turning to DG and granite. The views of the Kingsbury Grade during the first mile would have been dramatic except there was a lot of smoke from another fire way down by Fresno. But there were some impressive trees. Considering the unicycle, trees and views it was an entertaining start.

42 Dave with Sugar Pine

43 Short Fat Tree

44 Star Lake
At Monument Pass we gained views of Myers and South Lake Tahoe as the hike became more open and alpine. Star Lake is indeed a star and a great place for lunch. There was a couple camping there as well.

45 Freel Peak
After lunch we made for the high ground at the Freel Peak junction. It doesn't appear very impressive in this photo, in person, more so. Next we hiked over to Armstrong Pass were we met three day hikers who had come up a mile from a forest service road.
We said goodbye to Dave and continued up the ridge as he headed down the creek. At this point, I was expecting a small climb and a long drop down to Big Meadow. I got surprised again. The map doesn't show it well, but the next few miles were instead a long series of downs and ups climbing about 2,000 feet total yet gaining only 800 on very rocky and uneven ground. Every time I thought we were headed down, we had another small hill to climb.

46 Steep Ground
We were both getting tired. An said she felt like crying. Then it started to rain so I couldn't tell one way or the other. A thunderstorm had been building all afternoon but it didn't rain hard. Anyway, it was a welcome distraction. Now if we could only find the true top of this unending section.
The trail got flat and we could see no higher peaks. Finally, it descended for good. The down-hill was a relief but still had rolling parts mostly in forest.

47 Perfect Rock
At Tucker Flat Junction An found the "perfect rock for sleeping". We were both worn out. Or maybe both just having a bad day. We took a short break. There was still over four miles to go, but it's nice when you realize you're getting close to the end after such a workout.
We finished up at almost 7:00 P.M. for an average speed of 2.7 MPH which was better than I expected.
At 23 miles this was not the longest section on the Tahoe Rim Trail, but it was certainly the most taxing because of the unexpected and seemingly never-ending rolling climb on bad ground. It was also one of the most exhausting hikes I've ever done. Be ready for a workout.
Ratings out of 10
Trail - 4
Views - 6
Experience - 3
Overall - 4
Hike 8 - Section 7A - Echo Summit to Bayview

48 Echo Summit
Echo Summit - Go west from Myers to the summit on Highway 50.
Bayview - Go north on Highway 89 from South Lake Tahoe to Emerald Bay. Just before Eagle falls is the Bay View campground on your left. The trail-head is at the end of all the camp-sites.
Distance = 22.4 miles
Net climb = 2000 feet
Net descent = 2400 feet
Elev Miles Location
7380 0.0 Echo Summit
7525 2.2 Echo Lake
8120 9.6 North End of Lake Aloha
9380 15.8 Dicks Pass
8500 17.5 Bayview Junction
7000 22.4 Bayview Campground
One of the things I noticed on all these hikes is that the sections were too long for most day hikers. The day hikers we met were generally within a few miles of a trail-head. The beginning and end of each section had far higher traffic than the middle. You could even see it in the trail bed. Near the trail-heads the path is ten feet wide and well worn. Ten miles in, the path becomes a narrow single track, but never to small to easily spot.
Section 7 was too long for us too. Since we were hiking with the Sierra Club on section 6, we didn't go all the way to Echo Lakes as I'd planned. To pick this up would extend this section to 34.7 miles. After our grueling experience on section 5, we decided this would be too far for one day. Even more of a challenge, it was now late summer and we had less daylight.
These are the reasons we decided to break section 8 into two different hikes coming out at Emerald Bay both times. There were also two trails into Emerald Bay and since we'd never hiked either one, we'd get to see new ground both times. This turned out to be the best decision of the entire project.
We were at it again at 8:45 the next Sunday morning, September 16, 2007. We started at Echo Summit to pick up the 2.2 miles section to Echo Lake. This was another example of a very narrow, lightly traveled trail. Maybe it was because of the many houses which are rare on the rest of the Tahoe Rim Trail. But in truth, I think it was because of the length of Section 7. Most people would use any excuse to cut it down to size.

49 Echo Lake
This short house part was mostly just a walk through the trees. That is, until you approach Lower Echo Lake. Then there was an excellent view of the lake and the granite basin behind it which you'd miss if you started this section at the lake parking lot below.

50 Angora Fire
Just as you leave lake level, there's a sign about camping in the Desolation Wilderness area. A hundred feet to the right is a view of Lake Tahoe. Check it out. It's the only one you'll see on this section unless you cut out to Emerald Bay as we did. When we were there, planes were re-seeding after the fire from a couple of months earlier. Bye-bye Lake Tahoe for the rest of the day. The trail then gets back to Echo Lake and surrounding granite.

51 Echo Lake Houses

52 Echo Lake Boating

53 Over-loaded Mule

54 Upper Echo Lake
Others had told me this segment and the Desolation above were the most beautiful on the Tahoe Rim. I have to agree. These lakes, trees and granite mountains, even with the houses around them are breath-taking. And the trail provides mile after mile of these views. Make sure and bring your camera.
The trail is a bit rough but steady in it's climb out of the valley. I also turned around a lot. This would be another hike that would be just as visual in the other direction if you get the chance.

55 Entering Desolation
Above the Echo lakes we entered Desolation Wilderness and the trees. There wouldn't be any bikes on this section either. We were still on the PCT and besides, much of the ground was WAY too rough for most mountain bikers.

56 Desolation Valley

57 Desolation Valley
Dropping into Lake Aloha basin we discovered what the "desolation" was all about. Most of the valley has been scooped clean by glaciers leaving bare granite basins forming lakes. It has an eerie beauty that's hard to capture with a camera.
The dramatic granite terrain also makes it difficult to build a trail. Much of it is uneven and steps. One of those steps caught An's heel and she twisted her ankle. She screamed and went down. Her falling probably kept it from being a worse injury. Either way, it was a problem.
After a few minutes, An said she could walk on it if she stepped just right. So I got her a walking stick and she gave it a try. We were almost ten miles in so it was a toss-up as to which direction to get her out. An wanted to go on, so we did. Every now and then she would step wrong and squeal, but mostly she kept going; and at a pretty good pace.
About then I noticed the clouds gathering at the tops of the peaks. I was a little worried about a thunderstorm, but this seemed to be a cold wind from the north. Later that night it snowed. And it snowed again every few days for the next month. But I'm getting ahead of myself.

58 Susi Lake
We checked An's ankle after a mile and it wasn't swelling, so it was not a sprain. I tried holding her up on her bad side but the narrow trail generally made this unworkable. Since she was still enthusiastic, we left Aloha and continued northeast.
We had lunch at 13 miles with yet another panoramic view. If you like views of dramatic granite mountains, THIS is your hike. The views got even better climbing up to Dicks Peak where you could see it all from above.

59 Determined Trees Growning Out of Rock

60 Dicks Lake
The trail was rough, but the gain was steady. There's little wasted altitude loss along the way. You get what you pay for, instead of the rolling climbs of sections 1 and 6. This was a fun hike. Well, at least for me. An kept hobbling along.

61 Big Hiking Group
I should mention we saw more hikers and back-packers on this section than ALL the other sections combined. This was partly because there were two big groups of college students packing south, but there were several other smaller groups too. This is definitely the most popular section of the Tahoe Rim Trail for hiking and camping. And you can see why.
At the top we couldn't see Tahoe, but we could see were our cut-off and trail would take us - more beautiful country. We headed down slowly at first since An had to get used to the new grade.
She got comfortable and we were quickly down to the junction and headed toward Bayview. This ground was less traveled and even more difficult but mostly level. At just over two miles from the TRT there's a fork in the trail. Left goes down to Eagle Lake and Eagle Falls. We would do that one on the next hike. This time we went right and had to climb a bit, but it was worth it.

62 Eagle Canyon

63 Emerald Bay
Soon the trail broke out above Emerald Bay with one of the most beautiful scenes in the Sierra. It was not only a dramatic over-look of Emerald Bay from 2000 feet, it was also a panorama of the entire south end of South Lake Tahoe and the city.
And it wasn't just the summit. Much of this trail down to the campground is vivid as it switches back and forth through trees and lakes. Over half way down there was an excellent overlook where I got some more pictures. I was leaping from rock to rock in a care-free fashion when it happened. Yep, I twisted MY ankle. An started laughing, then handed me her stick. I'm sure she thinks I was faking it, but I wasn't. Fortunately, it wasn't as bad as hers and I had no problem getting to the car.
We finished at 6:30 for a speed of 2.6 MPH which is not bad for an injured hiker on bad ground. An did an amazing job considering that she hobbled nearly 12 miles. And for me, this was an excellent hike - my second favorite of the Tahoe Rim Trail.
Ratings out of 10
Trail - 4
Views - 10
Experience - 10
Overall - 9
Hike 9 - Section 7B - Barker Pass to Eagle Falls

64 Richardsons Lake
Barker Pass - Go south from Tahoe City on Highway 89 for 4.25 miles and turn right onto Blackwood Canyon Road (Forest Service Rd 15N38). Go west up the hill to the summit and trail-head at 7.2 miles.
Eagle Falls - Go north on Highway 89 from South Lake Tahoe to Emerald Bay. Trail-head is in the Eagle Falls parking lot.
Distance = 20.1 miles
Net climb = 800 feet
Net descent = 1500 feet
Elev Miles Location
7650 0.0 Barker Pass
7800 15.0 Middle Velma Lake
7800 15.3 Emerald Bay Junction
8500 17.5 Eagle Falls Junction
7000 20.1 Eagle Falls
As I said, it snowed the night we completed the last section. A few nights later it snowed again - hard. Winter was coming. We needed to get this objective completed before it got deep. But An needed to let her foot heal up too. The doctor said it was a pulled tendon on the side of her foot. She was fine on level ground but very painful if twisted sideways. And it would take about a month to heal. Maybe some of the snow would melt by then.
This last section looked like an easy hike, but at least the last third was on uneven ground. For these reasons, we didn't get back to Barker Pass until October 14.
Dave dropped us off at 10:00 A.M. and headed to the casino to watch football. Once we described the views, he planned to hike the Bayview / Eagle Falls loop in the afternoon so he'd be there to pick us up.
We were only about a mile down the trail when An squealed and almost fell down. I caught her and held her up as she started crying. It was tears of frustration. We only had this one section to go and she wanted to complete the project.
I suggested we try to get Dave on the cell phone and even check for signal (no luck). So we would have to hike down Barker Pass road until we got signal. But An was determined to hike this final section. I had brought ski poles for her to use, and she said she just needed to get used to them and keep her foot level. We pushed on away from the road, committed to the hike.

65 Light Use

66 Some Snow
I remember thinking about halfway through this segment, this is the most remote area of the entire Tahoe Rim Trail. Almost anywhere else you can find a shortcut down to the lake or paved road in a couple of miles. Here, there was a mountain ridge between us and the lake and no pavement for at least eight miles in any direction. It was even more remote than Desolation Valley.
In general, An DID get better with foot placement and using those ski poles. She squealed about once an hour at the beginning. By the time we got to the bad ground, it was less. Good thing we didn't do it in reverse.
This first 15 miles turned out to be a mostly flat low-stress hike through the trees. There were few view-points, though we did find a nice one for lunch. After that was Desolation Wilderness again and it got beautiful in every direction.
There were several lakes and granite peaks as we approach the Eagle Falls / Bayview junction. This time we took the left branch and dropped down instead of climbing the ridge. That's when the views got even more dramatic.

67 Hard Ground for Growing

68 Emerald Bay
This is a VERY steep descent into a v-shaped canyon and is mostly rock steps. It's a great place to be at sunset (and I would think even better at sunrise) as the light hits the three thousand foot of rock walls.
Because of An's foot, we didn't do any side trips, but Eagle Lake was a short one about half way down. Near the bottom we watched a group repelling off a hundred foot section of cliff. Again, you tend to see people near the trail ends, not the middle.
We got to the car at 6:00 for 2.5 MPH, though the last part was much slower. For me it was a very pleasant hike. An had to work harder, but she finish another twenty mile hike on rough ground with a bad foot. She had finished her objective in spite of the pain. That's determination.
Ratings out of 10
Trail - 6
Views - 7
Experience - 8
Overall - 7
Conclusion
The project went pretty much as planned, though more sporadic than I'd envisioned. We started well with 5 hikes in June, not missing a weekend. Then only one in August, two in September and one in October.
Though there was more variation in the sections than I would have guessed, all the hikes are moderate to difficult. But you can't tell just HOW difficult from the mileage or altitude numbers. That's why I thought it was worth posting this review.
If you have time for a long hike, section 3 from Tahoe Meadows to Spooner Summit is a great choice. Or the more famous first half of section 7 from Echo Lakes to Emerald Bay at Bayview would also be excellent. But Section 3 is more panoramic of Tahoe with a better trail. Section 7 has prettier ground and mountains but is a more difficult walk.
Finally, if you're short on time but still want to get a taste of Tahoe hiking, try the hike that's not even ON the Tahoe Rim Trail - the Eagle Falls / Bayview hike at Emerald Bay. This 6 mile loop is very steep with a 2000 foot gain and drop, but the granite canyon and lake views are worth it. I've decided it's my favorite short hike at Lake Tahoe.
Enjoy the miles.
And let me know what YOU think.


Subscribe to:
Posts (Atom)


